Displaying Gravity Forms form entries on the front end of your WordPress site can significantly enhance user experience and engagement. When visitors can see their submitted data, it creates a sense of transparency and validation, reinforcing trust in your website. For instance, if users submit testimonials, reviews, or comments, displaying these entries publicly showcases real feedback, building a community feel and social proof. This transparency can lead to increased interaction as users are more likely to contribute when they see their input is valued and visible to others. Additionally, for businesses, showcasing client entries such as success stories or project completions can serve as powerful marketing tools, highlighting real-life applications of their services or products.
Furthermore, displaying form entries can streamline communication and information sharing. In contexts like event registrations, contest entries, or user-generated content, having submissions visible on the front end can reduce administrative overhead. Users can check if their submissions were received and view other participants’ entries, fostering a collaborative and interactive environment. This functionality is particularly beneficial for community-driven sites, educational platforms, and collaborative projects, where visibility of contributions can drive further engagement and participation. Overall, leveraging the front end to display form entries not only enhances user experience but also maximizes the potential of your WordPress site as a dynamic and interactive platform.
Gravity Forms is a powerful WordPress plugin that allows you to create and manage forms easily. In this guide, we’ll explore how to generate and display Gravity Forms entries on the front end of your WordPress site.
Video Guide
Step 1: Retrieve Gravity Forms Entries
To begin, you can use the Gravity Forms API to retrieve entries for a specific form. In your code, $form_id is set to ‘1’, and the GFAPI::get_entries() function is used to fetch entries for that form. The resulting array contains information about each entry, including form ID, date created, IP address, and the form fields’ values.
Step 2: Display Entries on the Front End
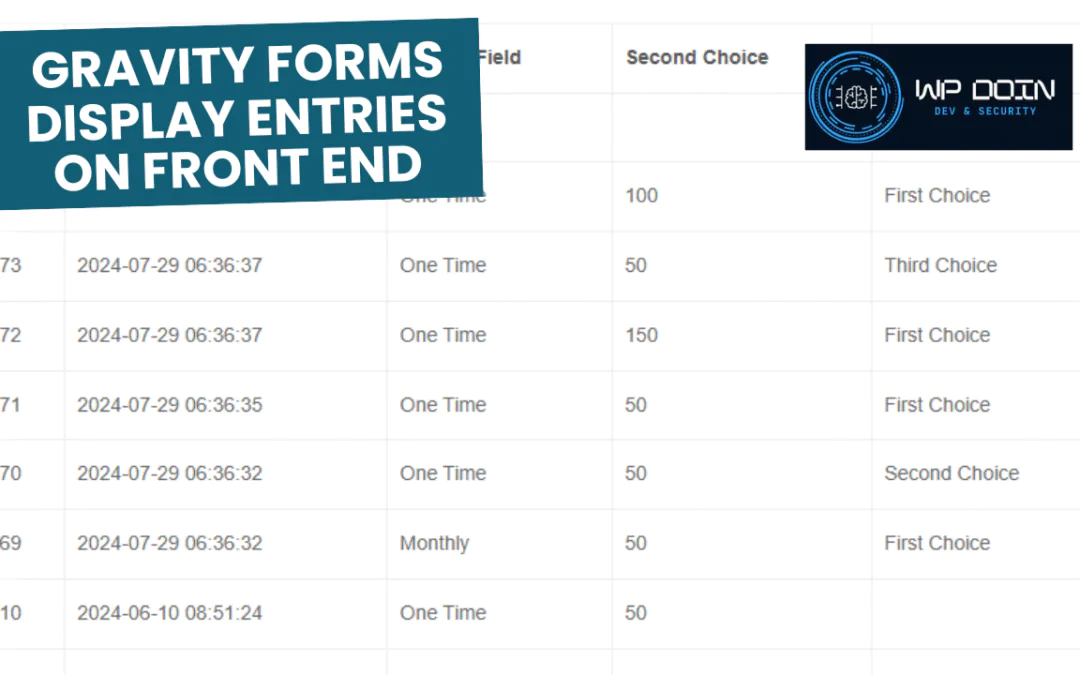
Now, let’s display these entries on the front end of your WordPress site. You can loop through the entries and output the relevant information. For example, to display the values of “Testing Field” and “Second Choice” from the first entry:
Feel free to customize the HTML structure and formatting to match your site’s design.
Step 3: Enhance Display with Conditional Logic
To make the display more dynamic, you can use conditional logic. For instance, only show entries that meet specific criteria or format the output differently based on the values. Here’s a simple example:
Step 4: Add HTML Markup to the Entries Display
This code will generate an HTML table with headers for ID, Date Created, Testing Field, Second Choice, and so on. You can customize the table headers and add more <th> and <td> elements to include other fields from your form.
Example
ID
Date Created
Testing Field
Second Choice
Third Choice
821
2025-01-06 00:36:39
Monthly
474
2024-07-29 06:36:37
One Time
100
First Choice
473
2024-07-29 06:36:37
One Time
50
Third Choice
472
2024-07-29 06:36:37
One Time
150
First Choice
471
2024-07-29 06:36:35
One Time
50
First Choice
470
2024-07-29 06:36:32
One Time
50
Second Choice
469
2024-07-29 06:36:32
Monthly
50
First Choice
310
2024-06-10 08:51:24
One Time
50
309
2024-06-10 08:51:02
Monthly
100
Conclusion
By following these steps, you can generate and display Gravity Forms entries on the front end of your WordPress site. This opens up possibilities for creating user dashboards, public form submissions, or any other scenario where you want to showcase form data outside of the WordPress admin.
Feel free to adapt and expand upon this guide based on your specific needs and the complexity of your forms.
By browsing through the site and filling in the Contact Forms you agree to our PRIVACY POLICY. Moreover WP doin website uses COOKIES to improve your experience. We assume you're ok with this, but you can opt-out if you wish. ACCEPTREJECTCookie settings
Privacy & Cookies Policy
Privacy Overview
This website uses cookies to improve your experience while you navigate through the website. Out of these, the cookies that are categorized as necessary are stored on your browser as they are essential for the working of basic functionalities of the website. We also use third-party cookies that help us analyze and understand how you use this website. These cookies will be stored in your browser only with your consent. You also have the option to opt-out of these cookies. But opting out of some of these cookies may affect your browsing experience.
Necessary cookies are absolutely essential for the website to function properly. This category only includes cookies that ensures basic functionalities and security features of the website. These cookies do not store any personal information.
Cookie
Duration
Description
cookielawinfo-checkbox-advertisement
1 year
Set by the GDPR Cookie Consent plugin, this cookie records the user consent for the cookies in the "Advertisement" category.
cookielawinfo-checkbox-analytics
1 year
Set by the GDPR Cookie Consent plugin, this cookie records the user consent for the cookies in the "Analytics" category.
cookielawinfo-checkbox-functional
1 year
The GDPR Cookie Consent plugin sets the cookie to record the user consent for the cookies in the category "Functional".
cookielawinfo-checkbox-necessary
1 year
Set by the GDPR Cookie Consent plugin, this cookie records the user consent for the cookies in the "Necessary" category.
cookielawinfo-checkbox-others
1 year
Set by the GDPR Cookie Consent plugin, this cookie stores user consent for cookies in the category "Others".
cookielawinfo-checkbox-performance
1 year
Set by the GDPR Cookie Consent plugin, this cookie stores the user consent for cookies in the category "Performance".
CookieLawInfoConsent
1 year
CookieYes sets this cookie to record the default button state of the corresponding category and the status of CCPA. It works only in coordination with the primary cookie.
Functional cookies help to perform certain functionalities like sharing the content of the website on social media platforms, collect feedbacks, and other third-party features.
Cookie
Duration
Description
__cf_bm
30 minutes
Cloudflare set the cookie to support Cloudflare Bot Management.
aet-dismiss
never
Disqus sets this cookie for the functionality of the website’s comment system.
badges-message
never
Disqus sets this cookie for the functionality of the website’s comment system.
drafts.queue
never
Disqus sets this cookie for the functionality of the website’s comment system.
submitted_posts_cache
never
Disqus sets this cookie for the functionality of the website’s comment system.
Performance cookies are used to understand and analyze the key performance indexes of the website which helps in delivering a better user experience for the visitors.
Cookie
Duration
Description
__jid
30 minutes
Disqus sets this cookie to remember the user's Disqus login credentials across websites that use Disqus.
Analytical cookies are used to understand how visitors interact with the website. These cookies help provide information on metrics the number of visitors, bounce rate, traffic source, etc.
Cookie
Duration
Description
__gads
1 year 24 days
Google sets this cookie under the DoubleClick domain, tracks the number of times users see an advert, measures the campaign's success, and calculates its revenue. This cookie can only be read from the domain they are currently on and will not track any data while they are browsing other sites.
_ga
1 year 1 month 4 days
Google Analytics sets this cookie to calculate visitor, session and campaign data and track site usage for the site's analytics report. The cookie stores information anonymously and assigns a randomly generated number to recognise unique visitors.
_ga_*
1 year 1 month 4 days
Google Analytics sets this cookie to store and count page views.
_gh_sess
session
GitHub sets this cookie for temporary application and framework state between pages like what step the user is on in a multiple step form.
brwsr
1 year 1 month 4 days
This cookie is set by the provider Impact Radius. This cookie is used for affiliate marketing.
CONSENT
2 years
YouTube sets this cookie via embedded YouTube videos and registers anonymous statistical data.
disqus_unique
1 year
Set to record internal statistics for anonymous visitors.
Advertisement cookies are used to provide visitors with relevant ads and marketing campaigns. These cookies track visitors across websites and collect information to provide customized ads.
Cookie
Duration
Description
__gpi
1 year 24 days
Google Ads Service uses this cookie to collect information about from multiple websites for retargeting ads.
DSID
1 hour
This cookie is set by DoubleClick to note the user's specific user identity. It contains a hashed/encrypted unique ID.
IDE
1 year 24 days
Google DoubleClick IDE cookies store information about how the user uses the website to present them with relevant ads according to the user profile.
test_cookie
15 minutes
doubleclick.net sets this cookie to determine if the user's browser supports cookies.
VISITOR_INFO1_LIVE
5 months 27 days
YouTube sets this cookie to measure bandwidth, determining whether the user gets the new or old player interface.
YSC
session
Youtube sets this cookie to track the views of embedded videos on Youtube pages.
yt-remote-connected-devices
never
YouTube sets this cookie to store the user's video preferences using embedded YouTube videos.
yt-remote-device-id
never
YouTube sets this cookie to store the user's video preferences using embedded YouTube videos.
yt.innertube::nextId
never
YouTube sets this cookie to register a unique ID to store data on what videos from YouTube the user has seen.
yt.innertube::requests
never
YouTube sets this cookie to register a unique ID to store data on what videos from YouTube the user has seen.


Thank you very much! Great article!
Absolutely 🙂 I am glad you enjoyed it.