Echo Assistant is available throughout the tutorial-just select any text and click “Ask Echo” to get more detailed information on the topic.
Contact Form 7 is a popular and free WordPress plugin that allows users to create and manage contact forms on their websites. It’s widely used due to its simplicity, flexibility, and customization options.
Intro
In this tutorial, I’ll guide you through creating a custom Contact Form 7 templates, which you can pass over to any website you own, manage, or use.
Note: some of the tips & tricks that I’ll be sharing here come from my previous tutorials regarding the topic: https://wp-doin.com/category/contact-form-7/, so the idea is to reuse some of the ideas here.
Note 2: I assume you already know how to install, activate, and configure the Contact Form 7 and its basic usage, so I’ll skip this part.
Note 3: You’ll need a basic knowledge of HTML and CSS to understand this tutorial.
Setting up Contact Form 7
The Default Contact Form 7 Looks
By default, our Contact Form 7 looks as such:
Contact Form 7 default looks
Custom Contact Form 7 Template Setup
The idea is to use the base Contact Form 7, w/o any plugins. And to do so, I propose to add a custom class to our Contact Form 7 form. There are two simple ways of doing so:
1. We either wrap the whole form in a custom wrapper, with a custom CSS class – see the attached image.
Contact Form 7 CSS class
2. Or, while embedding the form, add a custom CSS class to it, say:
contact-form-7 id="1234" title="Contact form Template" html_class="c-custom-template-wrap c-custom-template-wrap--blue" – remember about adding braces around that text [], or it won’t embed.
Now, then we’ll use this setup as a base for two different templates. To put it simply, each different class assigned to our Contact Form 7, will correspond to a slightly different Contact Form 7 template, allowing us to tweak these as we go. Carrying over the code from one website to another should be straightforward: Just copy the HTML code, paste the CSS, and assign a different class to the form of your choice. Or: create two different forms, based on the markup provided above.
To make matters simple, I’ll proceed with the first method from above. Let’s assume that our final Contact Form 7 HTML would be as follows:
Now then, with that template set, we can set up a number of CSS classes that alter the layout of our Contact Form 7. Let’s go ahead and do something really simple here.
Contact Form 7 Template Blue
You may have noticed that we’ve added two classes to our Contact Form 7 template: c-custom-template-wrap and c-custom-template-wrap–blue. We’ll use the first one to modify the overall look of our Contact Form 7, and we’ll use the second class to adjust its colours to blue.
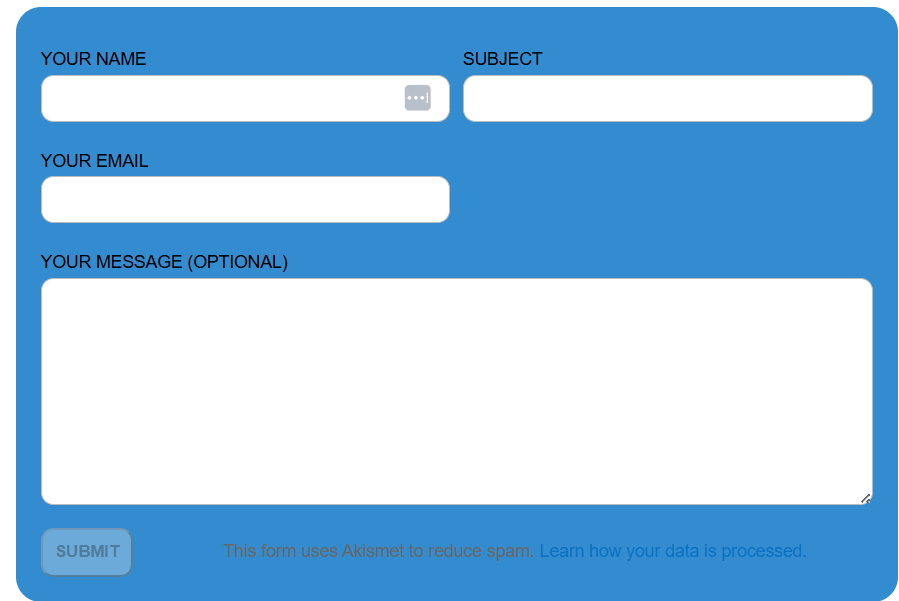
We’ll do some polishing here. Let’s make sure that our Contact Form template has two columns and its background is blue. To do so, go to Appearance -> Customize -> Additional CSS or Custom CSS. Note: this varies depending on the Theme you are using, so it may need to be added manually.
Now, our Contact Form 7 Template will have a blue background, border radius, and will be split into two columns, say:
Contact Form 7 Template Blue
Contact Form 7 Template Yellow
Similarly to the above, we’ll do something similar with our yellow template, let’s swap the .c-custom-template-wrap–blue class name with .c-custom-template-wrap–yellow, and let’s add the following CSS code:
With that changes in place, our Contact Form 7 Template Yellow will look as follows:
Contact Form 7 Template Yellow
Summary
While templates aren’t supported by default with Contact Form 7. It’s pretty easy to come up with a number of these on your own, using very simple CSS and HTML rules. Those templates can then be expanded upon next and reused as separate components. Just copy and paste the code you came up with, and you should save lots of time redoing these 🙂
Alternative to Contact Form 7 👇
If you’re looking for a more robust and user-friendly alternative with advanced features and greater flexibility, consider trying Gravity Forms instead. It offers a powerful drag-and-drop form builder, advanced conditional logic, built-in integrations with popular marketing and CRM platforms, payment processing support, and extensive customization options — making it an excellent choice for businesses and websites that require more than just a basic contact form solution.
By browsing through the site and filling in the Contact Forms you agree to our PRIVACY POLICY. Moreover WP doin website uses COOKIES to improve your experience. We assume you're ok with this, but you can opt-out if you wish. ACCEPTREJECTCookie settings
Privacy & Cookies Policy
Privacy Overview
This website uses cookies to improve your experience while you navigate through the website. Out of these, the cookies that are categorized as necessary are stored on your browser as they are essential for the working of basic functionalities of the website. We also use third-party cookies that help us analyze and understand how you use this website. These cookies will be stored in your browser only with your consent. You also have the option to opt-out of these cookies. But opting out of some of these cookies may affect your browsing experience.
Necessary cookies are absolutely essential for the website to function properly. This category only includes cookies that ensures basic functionalities and security features of the website. These cookies do not store any personal information.
Cookie
Duration
Description
cookielawinfo-checkbox-advertisement
1 year
Set by the GDPR Cookie Consent plugin, this cookie records the user consent for the cookies in the "Advertisement" category.
cookielawinfo-checkbox-analytics
1 year
Set by the GDPR Cookie Consent plugin, this cookie records the user consent for the cookies in the "Analytics" category.
cookielawinfo-checkbox-functional
1 year
The GDPR Cookie Consent plugin sets the cookie to record the user consent for the cookies in the category "Functional".
cookielawinfo-checkbox-necessary
1 year
Set by the GDPR Cookie Consent plugin, this cookie records the user consent for the cookies in the "Necessary" category.
cookielawinfo-checkbox-others
1 year
Set by the GDPR Cookie Consent plugin, this cookie stores user consent for cookies in the category "Others".
cookielawinfo-checkbox-performance
1 year
Set by the GDPR Cookie Consent plugin, this cookie stores the user consent for cookies in the category "Performance".
CookieLawInfoConsent
1 year
CookieYes sets this cookie to record the default button state of the corresponding category and the status of CCPA. It works only in coordination with the primary cookie.
Functional cookies help to perform certain functionalities like sharing the content of the website on social media platforms, collect feedbacks, and other third-party features.
Cookie
Duration
Description
__cf_bm
30 minutes
Cloudflare set the cookie to support Cloudflare Bot Management.
aet-dismiss
never
Disqus sets this cookie for the functionality of the website’s comment system.
badges-message
never
Disqus sets this cookie for the functionality of the website’s comment system.
drafts.queue
never
Disqus sets this cookie for the functionality of the website’s comment system.
submitted_posts_cache
never
Disqus sets this cookie for the functionality of the website’s comment system.
Performance cookies are used to understand and analyze the key performance indexes of the website which helps in delivering a better user experience for the visitors.
Cookie
Duration
Description
__jid
30 minutes
Disqus sets this cookie to remember the user's Disqus login credentials across websites that use Disqus.
Analytical cookies are used to understand how visitors interact with the website. These cookies help provide information on metrics the number of visitors, bounce rate, traffic source, etc.
Cookie
Duration
Description
__gads
1 year 24 days
Google sets this cookie under the DoubleClick domain, tracks the number of times users see an advert, measures the campaign's success, and calculates its revenue. This cookie can only be read from the domain they are currently on and will not track any data while they are browsing other sites.
_ga
1 year 1 month 4 days
Google Analytics sets this cookie to calculate visitor, session and campaign data and track site usage for the site's analytics report. The cookie stores information anonymously and assigns a randomly generated number to recognise unique visitors.
_ga_*
1 year 1 month 4 days
Google Analytics sets this cookie to store and count page views.
_gh_sess
session
GitHub sets this cookie for temporary application and framework state between pages like what step the user is on in a multiple step form.
brwsr
1 year 1 month 4 days
This cookie is set by the provider Impact Radius. This cookie is used for affiliate marketing.
CONSENT
2 years
YouTube sets this cookie via embedded YouTube videos and registers anonymous statistical data.
disqus_unique
1 year
Set to record internal statistics for anonymous visitors.
Advertisement cookies are used to provide visitors with relevant ads and marketing campaigns. These cookies track visitors across websites and collect information to provide customized ads.
Cookie
Duration
Description
__gpi
1 year 24 days
Google Ads Service uses this cookie to collect information about from multiple websites for retargeting ads.
DSID
1 hour
This cookie is set by DoubleClick to note the user's specific user identity. It contains a hashed/encrypted unique ID.
IDE
1 year 24 days
Google DoubleClick IDE cookies store information about how the user uses the website to present them with relevant ads according to the user profile.
test_cookie
15 minutes
doubleclick.net sets this cookie to determine if the user's browser supports cookies.
VISITOR_INFO1_LIVE
5 months 27 days
YouTube sets this cookie to measure bandwidth, determining whether the user gets the new or old player interface.
YSC
session
Youtube sets this cookie to track the views of embedded videos on Youtube pages.
yt-remote-connected-devices
never
YouTube sets this cookie to store the user's video preferences using embedded YouTube videos.
yt-remote-device-id
never
YouTube sets this cookie to store the user's video preferences using embedded YouTube videos.
yt.innertube::nextId
never
YouTube sets this cookie to register a unique ID to store data on what videos from YouTube the user has seen.
yt.innertube::requests
never
YouTube sets this cookie to register a unique ID to store data on what videos from YouTube the user has seen.