During our WordPress development career we’ve had plenty of problems creating WordPress widgets. Not only it’s quite hard to go through the amount of code required for a simple widget, the documentation itself is quite complex, and doesn’t explaing everything in detail. Experienced programmers will quickly find out, that the best way to have full control over a widget is to copy more code then the documentation suggests.
Given the above we’ve created a simple, yet powerful PHP Class that helps one created WordPress widgets in a much quicker way.
The Widget Base Class
The library facilitates creation of WordPress widgets. It allows one for semi-automatic creation of widget fields without the worry of their validation, sanitazation or their value being saved during widget save action. Our ACF Recent Posts Widget plugin is using this class to create a number of fourty two Widget fields that are being used to alter the recent posts display!
How to use the Widget Base Class
1. Create a new PHP class that extends the Widget Base Class, for instance in case of the ACFRPW the line goes as follows:
class ACF_Rpw_Widget extends Widget_Base {2. Specify, within the constructor of your class all of the fields you’d like to use, creating an array of elements, for instance:
function __construct() {

  $this->text_fields = array( 'text_field_one', 'text_field_two' );
  $this->text_areas = array( 'text_area_one', 'text_area_two' );
  $this->checkboxes = array( 'checkbox_one', 'checkox_two' );
  $this->select_fields = array( 'select_one', 'select_two' );

  parent::__construct(
    'my_sample_widget', // Base ID
     __( 'My Sample Widget', 'msplw' ), // Name
    array(
      'description' => __( 'My Sample Widget', 'msplw' ),
      'class' => 'mspl3-class', ), array(
      'width' => 750,
      'height' => 350
    )
  );
}
Then to render the fields we have just setup we simply need to call the library’s generation methods: gti, gtc, gts and gt. That stand for generate input, generate checkbox, generate select and generate textarea. For instance:
public function form($instance) {
  $this->form_instance = $instance;
  echo parent::gti( 'text_field_one', __( 'Text Field One', 'msplw' ) );
  echo parent::gti( 'text_field_two', __( 'Text Field Two', 'msplw' ) );

  echo parent::gtc( 'checkbox_one', __( 'Check Field One', 'msplw' ), array( 'choice_one' => __( 'Choice One', 'msplw' ) ) );
  echo parent::gtc( 'checkox_two', __( 'Check Field Two', 'msplw' ), array( 'choice_one_two' => __( 'Choice One', 'msplw' ) ) );

  echo parent::gts( 'select_one', __( 'Select Field One', 'msplw' ), array( 'choice_one_select' => __( 'Choice One', 'msplw' ) ) );
  echo parent::gts( 'select_two', __( 'Select Field Two', 'msplw' ), array( 'choice_one_select_two' => __( 'Choice One', 'msplw' ) ) );

  echo parent::gt( 'text_area_one', __( 'Textarea Field One', 'msplw' ) );
  echo parent::gt( 'text_area_two', __( 'Textarea Field Two', 'msplw' ) );
}
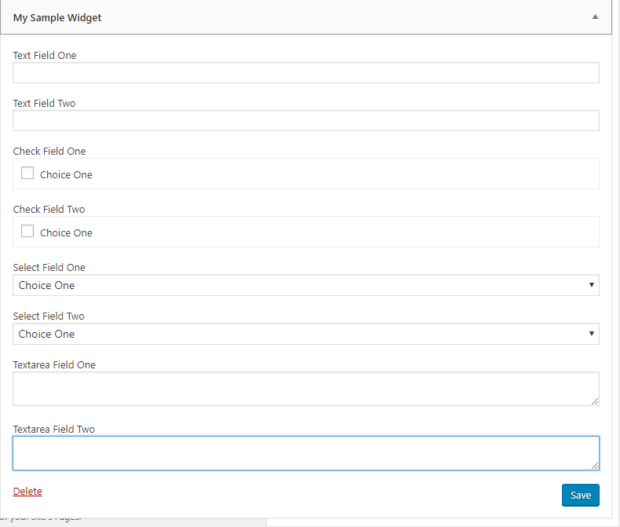
This will produce the following result:

Widget Back End Screen
Not only it will print the results it will also validate and sanitize them, without us having to worry about the problems associated with data validation. Note that the form function is required as it let’s one specify the options of select and checkbox fields. Note that their “names” (first arguments of each function to be precise) correspond to the names specified in our constructor. This is required for plugin to understand the values properly.
Now given the fact we have our input fields and their validation covered we can focus on the Widget Front End viewing interface only, that has to be put within the widget method of our class.
This saves us a lot of development time since we may now focus on the important visual aspects of the site (no clients care about the site’s behind the scenes functionality, let’s be honest with that).
Hopefully this articles explained the usage of the plugin in a bit more depth and will help one save a lot of time in creation of his custom Widgets. In the end what matters most is the Visual and functional layer of each website. Tools s such are simply used to speed up the development process.


